Facebook Pixel

Decoration

Matériaux Pont Masson Blog

Manubric: Transform Your Walls with Style

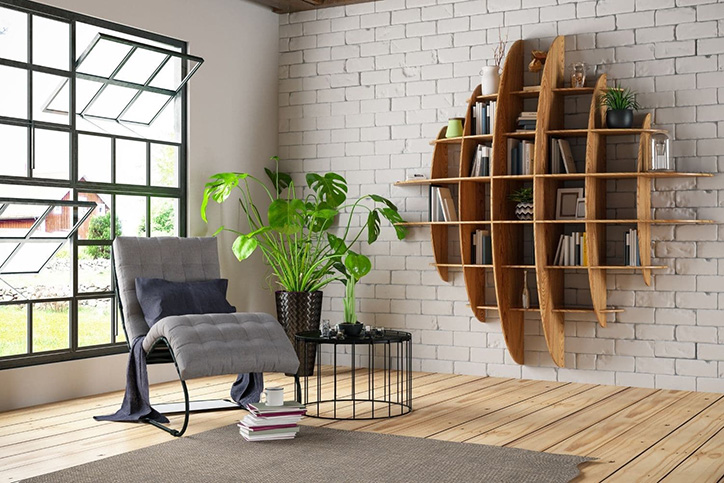
Dreaming of a brick or stone feature wall without the complexity of traditional masonry?
Manubric offers the perfect balance of authenticity, simplicity, and long-lasting design. Made in Quebec, these decorative stones and bricks can elevate any space — indoors or outdoors — with a warm and natural look.


What Is Manubric?

Manubric is a Quebec-based company specializing in lightweight decorative stone and brick.
Each piece is molded from real stones or bricks, then hand-coloured to replicate natural textures and tones.

The result: a beautiful, durable wall covering that installs easily and looks impressively realistic.

Because the products are made from lightweight and resilient materials, they can be applied to drywall, concrete, wood, and more. Their design makes them an accessible decorative solution, even for beginners.


The Advantages of Manubric Products

1. Remarkably realistic

Manubric stones and bricks closely mimic the appearance of natural stone or traditional brick, without the weight, structural requirements, or higher installation costs.

2. Easy to install

Designed with simplicity in mind, these products can be installed using standard mortar and basic tools.
No need to hire a mason — with a few steps, you can achieve a professional-quality finish.

3. Versatile and durable

Whether it’s for a living-room feature wall, a rustic kitchen, or an elegant exterior upgrade, Manubric products resist moisture, frost, and everyday wear.

4. A local and eco-friendly choice

Proudly made in Quebec, Manubric supports local manufacturing and reduces transportation impacts.
Their production process minimizes waste and ensures long-lasting materials.


Where to Use Manubric in Your Home

  • Living room: a brick feature wall for an industrial or loft-style atmosphere.

  • Kitchen: rustic charm behind the counter or around cabinetry.

  • Entryway: a stone accent wall for a warm, inviting look.

  • Exterior: durable cladding for walls, chimneys, or columns.


Conclusion

Choosing Manubric means opting for a decorative solution that is authentic, local, and easy to install.
At Pont Masson, you’ll find the Manubric products along with expert advice to help you complete your project confidently.

Matériaux Pont Masson Blog

How to Install Shelves on a Drywall Wall — Practical Guide

Want to add a bit of storage or style to your space without too much effort? Installing wall shelves is a simple, effective, and aesthetic solution. However, when working with drywall (gypsum board), it’s best to proceed carefully to avoid unpleasant surprises.

Here’s a step-by-step practical guide to help you achieve a clean, level, and secure installation.


Required Materials

Tools:

  • Measuring tape

  • Level (bubble or laser)

  • Pencil

  • Drill-driver

  • Drywall drill bits

  • Screwdriver

  • Masking tape

  • Stud finder (recommended)

Materials:

  • Shelf (or shelves)

  • Brackets or invisible mounts

  • Alligator anchors (recommended)

  • Plastic wall plugs (optional)

  • Screws


Step 1 – Planning

Before drilling, take a moment to plan:

  • Where exactly do you want to place the shelf?

  • Will it hold decorative items or heavier loads?

  • Can you screw into a wall stud? (This increases strength.)

Tip: Use a stud finder to locate solid points behind the wall. If you don’t have one, gently tap on the wall — a duller sound indicates a stud.


Step 2 – Draw Straight Reference Lines

  • Apply masking tape to the wall at the approximate shelf height.

  • Use your level to draw a perfectly straight line along the tape.

  • Mark where each bracket will go, ensuring they’re at the same height.

Tips for perfect alignment:

  • A laser level gives precise horizontal lines.

  • Fix one bracket first, place the shelf on it, and adjust the second bracket before drilling.

  • If installing multiple shelves, use a small cardboard or wood template to mark consistent heights.


Step 3 – Drill and Insert Anchors

If you can’t screw directly into a stud, use alligator anchors—they provide strong support in drywall.
Plastic anchors can work for lighter loads but are less durable.

  • Drill holes at your marked spots.

  • Insert the alligator anchors.

  • Screw gently so the anchor expands and locks securely into the wall.


Step 4 – Attach the Brackets

  • Screw the brackets into the anchors (or directly into a stud, if available).

  • Use your level to confirm they’re straight before tightening the screws fully.


Step 5 – Install the Shelf

  • Place the shelf on the brackets.

  • If there are pre-drilled holes, secure the shelf from underneath using short screws.

  • Do one final level check — and you’re done!


Extra Tips

  • Space multiple shelves evenly (12–16 inches apart, depending on use).

  • For heavy loads (books, dishes), use alligator anchors and try to secure at least one screw into a stud.

  • For a minimalist look, choose invisible mounts, though they require more precise installation.


In Summary

Installing shelves on drywall is perfectly doable with the right anchors and careful preparation.
With alligator anchors and accurate markings, your shelves will be straight, sturdy, and ready to showcase your favorite décor.