Facebook Pixel

Tagged with 'Building Materials'

Matériaux Pont Masson Blog

How to Know When to Replace Your Roof Shingles

Your roof is one of the most important components of your home. It protects you from harsh weather, cold, heat, and moisture. However, many homeowners wait too long before replacing their shingles, which can lead to costly damage. So, how do you know when it’s time to replace your roof shingles? Here are the key signs to watch for.


1. The Age of Your Shingles

Asphalt shingles typically last between 15 and 25 years, depending on their quality, installation, and weather conditions. In Québec and Ontario, harsh winters, freeze-thaw cycles, and strong winds can shorten their lifespan.

Good to know:
If your roof is approaching or has exceeded 15–20 years, even if it still looks fine, a professional inspection is strongly recommended.


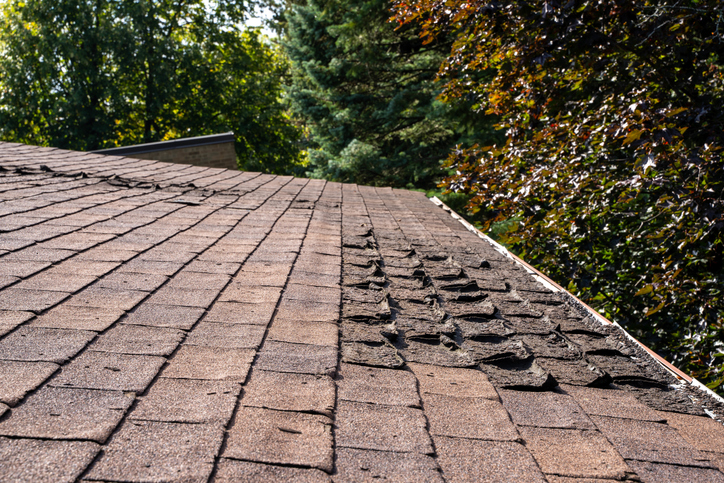
2. Shingles That Are Curling, Cracked, or Lifting

One of the most obvious signs of an aging roof is shingles that are:

  • curling or buckling;

  • cracked;

  • lifting due to wind exposure.

These issues indicate that the shingles have lost their flexibility and sealing ability.


3. Granules in the Gutters or on the Ground

Asphalt shingles are coated with granules that protect them from UV rays and wear. Over time, these granules begin to loosen and fall off.

Warning sign:
If you notice a significant amount of granules in your gutters or around your home’s foundation, it’s a clear sign your shingles are deteriorating.


4. Water Leaks or Stains on Ceilings

Water infiltration should never be ignored. Even small brown stains on ceilings or walls can indicate:

  • damaged shingles;

  • worn underlayment;

  • ventilation or flashing issues.

The longer you wait, the more expensive repairs can become, as water can damage insulation, roof structure, and even cause mold.


5. Missing Shingles After a Storm

After strong winds or storms, it’s always a good idea to visually inspect your roof. Missing or displaced shingles expose your home directly to the elements.

A single missing shingle can sometimes be repaired, but if this happens repeatedly, a full roof replacement may be the best solution.


6. A Sagging Roof

A visibly sagging roof is a serious warning sign. It may indicate structural problems caused by:

  • prolonged water infiltration;

  • excess weight from snow or ice;

  • deterioration of the roof decking.

In this situation, it’s essential to consult a professional as soon as possible.


7. Rising Heating or Cooling Costs

An aging roof can lose its energy efficiency. If your home becomes harder to heat in winter or keep cool in summer, your roof could be part of the problem.

Replacing shingles and improving roof ventilation can increase comfort and reduce energy costs.


Repair or Replace?

A simple repair may be enough if:

  • the roof is relatively new;

  • the damage is localized;

  • the roof structure is in good condition.

However, if problems are frequent or widespread, replacing the shingles is often more cost-effective in the long run.


Trust the Experts at Pont-Masson

At Pont-Masson, we understand that your roof is a major investment. Our experts can help you:

  • assess the condition of your shingles;

  • choose the right materials for your home and Canada's climate;

  • determine the right time to replace your roof.

Not sure about your roof’s condition?
It’s always better to inspect it early before a small issue becomes a major repair.


Need Roofing Advice or Materials?

Visit us in-store or explore www.pontmasson.com to discover our selection of shingles, roofing accessories, and expert advice.

Matériaux Pont Masson Blog

How to Calculate the Number of Siding Packs Needed to Redo a House Exterior

Redoing your home’s exterior siding is a major project that enhances the appearance, protects the structure, and improves energy efficiency. To plan properly, you need to know how many packs of siding will be required. Here’s a clear guide to help you calculate it yourself.


1. Measure the Wall Surface Area

Start by measuring each wall of the house: the width and height, in feet (ft). Multiply these two values to get the wall area in square feet (sq. ft).

For example, a wall that’s 30 ft wide and 10 ft high gives you 300 sq. ft.

Do this calculation for each wall:

  • Front wall: 30 ft × 10 ft = 300 sq. ft

  • Back wall: 30 ft × 10 ft = 300 sq. ft

  • Left wall: 24 ft × 10 ft = 240 sq. ft

  • Right wall: 24 ft × 10 ft = 240 sq. ft
    Total gross area: 1,080 sq. ft


2. Subtract Openings

Next, calculate the surface area of windows and doors to subtract from the total area.

For example:

  • 1 door, 3 ft × 7 ft = 21 sq. ft

  • 5 windows, 3 ft × 4 ft = 12 sq. ft each → 60 sq. ft total
    Total openings: 81 sq. ft
    Net surface area to cover: 1,080 sq. ft – 81 sq. ft = 999 sq. ft


3. Add a Waste Margin

Add about 10% to 15% to compensate for cuts and fitting adjustments.

If you apply a 10% margin:
999 sq. ft × 1.10 = 1,098.9 sq. ft, which you can round up to 1,100 sq. ft


4. Calculate the Number of Packs Needed

Check how many square feet are covered by one pack of your chosen siding.
For example, one pack of CanExel Ridgewood D5 covers 44 sq. ft.
Divide the total surface area by the coverage per pack:

1,100 sq. ft ÷ 44 sq. ft = 25 packs

Always round up to the next whole number.
You’ll therefore need 25 packs.


Summary

Step Result
Wall area 1,080 sq. ft
Minus openings 81 sq. ft
Net surface area 999 sq. ft
+10% waste margin ≈ 1,100 sq. ft
Coverage per pack 44 sq. ft
Required packs 25 packs

Conclusion

By taking the time to measure accurately and account for waste, you can avoid surprises and ensure a well-planned siding project. It’s also wise to buy one or two extra packs to cover potential repairs or installation errors.

Matériaux Pont Masson Blog

How to Calculate Materials for Building a Pressure-Treated Wood Deck

How to Calculate Materials for Building a Pressure-Treated Wood Deck

Building a pressure-treated wood deck is a rewarding project that requires careful planning. Before grabbing your tools, you need to accurately estimate the materials. Here’s a practical guide to help you calculate everything you’ll need, with simple examples adaptable to any dimensions.


1. Define the Deck Area
Start by measuring the length and width of the deck to get the total square footage.
Formula:
Area = Length × Width
Example: A deck measuring 12 feet by 16 feet gives a total area of 192 square feet.


2. Calculate Decking Boards
The boards used measure 1-1/4" × 6", but the actual usable width is about 5-1/2 inches, or 0.458 feet.
Formula:
Linear feet required = Total area ÷ 0.458
Example:
192 ft² ÷ 0.458 = approx. 419 linear feet of boards.
Then, choose your board length (8', 10', 12', 14', or 16') to convert linear feet into board count.
Example:
419 ÷ 12 = approx. 35 boards of 12 feet.
Always plan for 10% extra for cuts and unexpected needs.


3. Calculate Joists
Joists are typically spaced 16 inches apart (1.33 feet). You’ll need one joist at each interval, plus one at each end.
Formula:
Number of joists = Deck width ÷ 1.33 + 1
Example:
For a 16-foot-wide deck:
16 ÷ 1.33 + 1 = approx. 13 joists.
Each joist should span the depth of the deck (e.g., 12 feet for a 12-foot-deep deck).


4. Calculate Beams and Posts
Beams:
The number depends on the span between supports (usually 6 to 8 feet). For a standard deck, install 2 to 3 beams parallel to the house.
Posts or Concrete Blocks:
Each beam needs a support every 6 to 8 feet.
Example:
For a 16-foot-wide deck, plan for about 6 to 9 posts depending on the structure.


5. Hardware and Accessories
Don’t forget:

  • About 30 to 40 wood screws per board.
  • 1 joist hanger per joist.
  • Beam anchors and other fasteners depending on your method.
  • Extra boards for finishing edges or skirting.

6. Quick Calculation Summary

  • Area = Length × Width
  • Linear feet of boards = Area ÷ 0.458
  • Number of boards = Linear feet ÷ chosen board length
  • Joists = Width ÷ 1.33 + 1
  • Beams = Based on span (usually 2 to 3)
  • Posts = 1 every 6 to 8 feet under each beam
  • Recommended surplus = 10% extra for each main material

Conclusion
By following these simple and flexible steps, you can adjust the calculations to any deck size. Always check your local building codes before starting construction.

Matériaux Pont Masson Blog

7 Tips for Building a Chicken Coop in the City: Practical and Eco-Friendly Guide

Keeping chickens in the city? Yes, it’s possible!
In addition to providing fresh eggs, chickens help reduce organic waste and bring life to your urban garden. But how do you build a coop that suits an urban environment? Follow this guide for a project that’s stylish, practical, and animal-friendly.


1. Check Local Regulations

Before you begin, check with your city or municipality. Many cities allow chickens, but there may be restrictions on the number of birds (usually 2 to 4) and the size of the coop. Roosters are often prohibited due to noise.


2. Choose the Ideal Location

Even in the city, your chickens need a peaceful space. Prioritize:

  • A shaded area to avoid overheating in summer
  • Well-drained soil to prevent moisture buildup
  • A spot sheltered from wind, such as near a fence or wall

3. Plan the Coop Structure

A good chicken coop includes three essential zones:

  • Sleeping shelter: A closed space with roosts and nesting boxes. Plan about 1 m² for every 2 to 3 chickens.
  • Outdoor run: A fenced area where they can safely scratch the ground.
  • Storage space: For feed, bedding, and accessories.

Tip: You can find all necessary materials—framing wood, plywood panels, and chicken wire—at Pont Masson.


4. Ensure Chicken Comfort

To keep your chickens happy:

  • Install roosts (about 30 cm per chicken)
  • Provide one nesting box for every 2 to 3 chickens, lined with straw
  • Ensure good ventilation without drafts
  • Set up a feeder and waterer protected from the elements

5. Make Cleaning Easy

Cleanliness is essential in urban settings to avoid odors and pests.

  • Use absorbent bedding (like wood shavings available at Pont Masson) and change it regularly
  • Clean the shelter weekly
  • Store feed in airtight containers

6. Think About Aesthetics

Your coop can blend beautifully into your urban garden:

  • Paint it in neutral or pastel tones (exterior paints available at Pont Masson)
  • Add a green roof for insulation and style
  • Create a small stone path for easy access to the run

7. Enjoy the Benefits

With a small urban chicken coop, you’ll enjoy:

  • Fresh eggs—often tastier and more nutritious
  • Reduced organic waste (chickens love peels!)
  • A touch of nature in the heart of the city

Conclusion: A Little Bit of Country in the City

Building an urban chicken coop is an accessible project that combines ecology, food autonomy, and animal welfare. With a bit of planning and the right materials—like those available at Pont Masson—your chickens will be happy, and so will you!

Matériaux Pont Masson Blog

How to Identify the Different Grades of Eastern White Pine Boards

Eastern White Pine is valued for its strength, fine texture, and versatility. Widely used in construction, cabinetry, and interior finishing, understanding the different grades available helps you choose the right boards for your project. Here’s a practical guide to help you identify these grades:


1. Select Grade

The Select grade is the highest category for Eastern White Pine. It’s ideal for premium projects where aesthetics are a priority.

  • Appearance: High-quality boards with a defect-free face, though the back may show more variation.
  • Uses: Fine woodworking, moldings, high-end furniture.
  • Advantages: Smooth finish requiring minimal prep before painting or staining.

2. Grades #1 & #2 (Sound Knots)

These grades feature visible but solid knots, offering a balance between appearance and functionality.

  • Appearance: Knotty wood with a pleasing look, suitable for visible applications.
  • Uses: Flooring, interior paneling, furniture, siding, cornices, trim, roof edges, and other exterior uses.
  • Advantages: Good durability with a natural, warm appearance.

3. Appearance Grade

This grade offers a rustic look with more character—perfect for projects where visual charm outweighs perfection.

  • Appearance: Rustic wood with character, ideal for projects that embrace these qualities.
  • Uses: Paneling, siding, rustic furniture, outdoor projects like fences, garden furniture, crates, cladding, and various industrial applications.
  • Advantages: Rustic aesthetic, affordable price, ideal for a natural style.

Finishing and Post-Purchase Treatment

Regardless of the grade chosen, final treatment (sanding, staining, sealing) can greatly enhance the appearance and durability of the boards.

  • For a modern look: Choose Select grade with light stain or white paint.
  • For a rustic style: Opt for Appearance grade with a dark stain.

Conclusion: Choosing the Right Grade for Your Project

The choice of Eastern White Pine grade depends mainly on your budget, intended use, and aesthetic preferences. For refined projects, go with Select. For rustic or functional styles, Grades #1 & #2 or Appearance grade are perfectly suited.

Do you have a project in mind and need help choosing the right grade? Feel free to share your ideas in the comments!

Matériaux Pont Masson Blog

5 Reasons to Choose Vinyl Siding for Your Home

When it comes to choosing siding for your home’s exterior, vinyl stands out as a popular and practical solution. Durable, attractive, and affordable, it offers many advantages that appeal to homeowners. Here are five compelling reasons to choose vinyl siding for your home:


1. Excellent Value for Money

Vinyl siding is notably more affordable than other materials like wood or brick. Not only is the initial purchase cost lower, but installation expenses are also reduced thanks to its lightweight nature and ease of installation. It’s an ideal option for homeowners looking to renovate without breaking the bank.


2. Impressive Durability

Designed to withstand the elements, vinyl doesn’t warp due to climate changes. It resists moisture, won’t rot, and doesn’t crack—even after years of exposure to sun, rain, or snow. Some manufacturers even offer warranties of 20 to 40 years, a testament to the material’s longevity.


3. Minimal Maintenance

Unlike wood, which requires regular sanding and painting, vinyl siding only needs a simple wash with soapy water to maintain its shine. There’s no need to repaint, saving you time and money in the long run.


4. Variety of Styles and Colors

Vinyl siding comes in a wide range of colors, textures, and styles. Whether you prefer a traditional or contemporary look, you’ll easily find a model that complements your home’s aesthetic. Some types of vinyl even mimic the appearance of wood—without the drawbacks.


5. Easy Installation

Vinyl siding is designed for quick and easy installation. Thanks to its interlocking system, it can be installed by professionals or experienced DIYers. Its lightweight panels are easy to handle, reducing labor time and cost.


Conclusion

Choosing vinyl siding means opting for an economical, durable, and stylish solution with minimal upkeep. Whether you’re renovating or building a new home, vinyl is a smart choice that combines performance and visual appeal. Don’t hesitate to consult a professional to explore available options and find the perfect siding for your home.

Matériaux Pont Masson Blog

Polyglass Products Now Available at Our Mirabel Branch!

Good news!
We’re excited to announce that Polyglass products are now available at our Mirabel branch.

Known for its innovative waterproofing solutions, Polyglass offers a complete range of high-performance roofing and waterproofing membranes. Whether you're a contractor, roofer, or homeowner, choosing the right products is essential to ensure the durability and performance of your roof.


Why Is It Crucial to Choose Quality Waterproofing Products?

Waterproofing is one of the most critical elements in roof installation and maintenance. A poor choice or careless installation can lead to water infiltration, structural damage, and high repair costs. Here’s why it’s essential to opt for high-performance waterproofing products:

Protection Against Water Infiltration
A poorly protected roof can allow water to seep in, causing mold, rot, and premature deterioration of materials.

Prevention of Structural Damage
Excess moisture can weaken the building’s structure and reduce the strength of the foundation, leading to costly repairs.

Improved Energy Efficiency
A well-sealed roof helps maintain a stable indoor temperature, reducing heat loss in winter and cool air loss in summer.

Extended Roof Lifespan
With quality waterproofing products like those from Polyglass, your roof will benefit from enhanced protection against weather and wear, extending its lifespan.


Why Choose Polyglass Products?

✔️ Advanced Technology: Self-adhesive and SBS-modified membranes for increased resistance
✔️ Superior Durability: Designed to withstand the harshest weather conditions
✔️ Easy Installation: Practical solutions that save time on your job sites


Visit Us at Our Mirabel Branch
Address: 9070, route Sir-Wilfrid-Laurier, Mirabel (Saint-Canut), J7N 0T2
Contact Us: 450-438-8898

Don’t miss this new arrival—make sure you have the best materials for your projects!